Three.jsでグリッチの練習メモ
グリッチの練習メモです。
1.ノイズを作る
頂点シェーダ
頂点シェーダは特別なことはしていません。
varying vec2 vUv;

void main() {
  vUv = uv;
  gl_Position = projectionMatrix * modelViewMatrix * vec4( position, 1.0 );
}
フラグメントシェーダー
//シンプレックスノイズ
vec3 mod289(vec3 x) {
    return x - floor(x * (1.0 / 289.0)) * 289.0;
}

vec2 mod289(vec2 x) {
    return x - floor(x * (1.0 / 289.0)) * 289.0;
}

vec3 permute(vec3 x) {
    return mod289(((x * 34.0) + 1.0) * x);
}

float snoise(vec2 v) {
    const vec4 C = vec4(0.211324865405187, // (3.0-sqrt(3.0))/6.0,
        0.366025403784439, // 0.5*(sqrt(3.0)-1.0),
        -0.577350269189626, // -1.0 + 2.0 * C.x,
        0.024390243902439); // 1.0 / 41.0,
    vec2 i = floor(v + dot(v, C.yy));
    vec2 x0 = v - i + dot(i, C.xx);

    vec2 i1;
    i1 = (x0.x > x0.y) ? vec2(1.0, 0.0) : vec2(0.0, 1.0);
    vec4 x12 = x0.xyxy + C.xxzz;
    x12.xy -= i1;

    i = mod289(i);
    // Avoid truncation effects in permutation,
    vec3 p = permute(permute(i.y + vec3(0.0, i1.y, 1.0)) + i.x + vec3(0.0, i1.x, 1.0));

    vec3 m = max(0.5 - vec3(dot(x0, x0), dot(x12.xy, x12.xy), dot(x12.zw, x12.zw)), 0.0);
    m = m * m;
    m = m * m;

    vec3 x = 2.0 * fract(p * C.www) - 1.0;
    vec3 h = abs(x) - 0.5;
    vec3 ox = floor(x + 0.5);
    vec3 a0 = x - ox;

    m *= 1.79284291400159 - 0.85373472095314 * (a0 * a0 + h * h);

    vec3 g;
    g.x = a0.x * x0.x + h.x * x0.y;
    g.yz = a0.yz * x12.xz + h.yz * x12.yw;
    return 130.0 * dot(m, g);
}

void main() {
  float offset = snoise(vUv);
  gl_FragColor = vec4(vec3(offset), 1.);

}
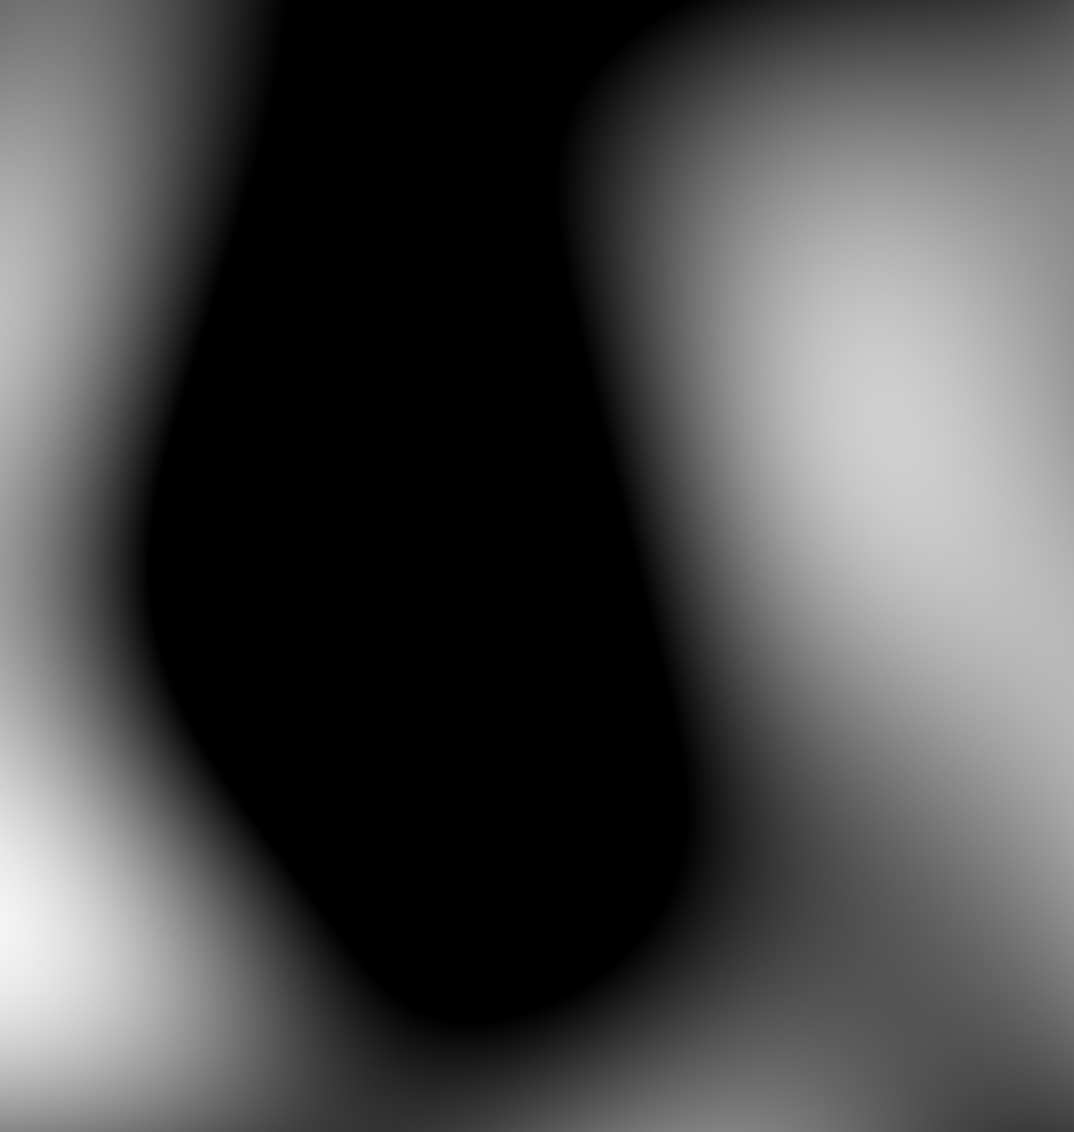
UV座標をそのままノイズ関数に渡すとこんな模様になります。
2. UV座標を動かしてみる
ノイズ関数と、頂点シェーダーは手順1と同じなので割愛したいと思います。 UV座標を動かしています。
float offset = snoise(vUv + time);
gl_FragColor = vec4(vec3(offset), 1.);

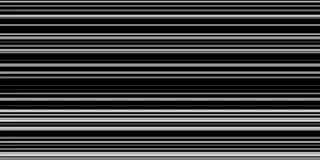
3. 模様の輪郭をはっきりさせる
void main(){
    float offset = snoise(vUv + time);
    //0.0以外の値が大きくなるため、ボケていた輪郭がくっきりする
    //distortionには10.0がuniform変数として設定されている
     offset = offset * distortion;
    gl_FragColor = vec4(vec3(offset), 1.);
}
4. テクスチャのUV座標を歪ませてみる
↓のテクスチャに、手順3のoffsetの値を入れてみます。

void main(){
    vec2 p = vUv;
    float offset = snoise(p + time);
    offset = offset * distortion;
    gl_FragColor = texture2D(tDiffuse,  vec2(offset));
}
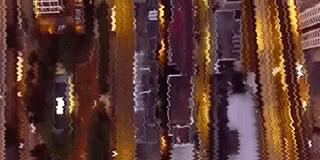
こんな感じになります。
5. テクスチャをゆらゆらさせる
テクスチャを横にゆらゆらさせます。 その為、y座標の変化を、UV座標のxの値に足します。
void main(){
    vec2 p = vUv;
    //y座標に経過時間を足す
    float y = p.y + time;
    float offset = snoise(vec2(y,0.0)) * 0.2;
    offset = offset * distortion;
    //fract関数で小数以下の値だけ使う。
    gl_FragColor = texture2D(tDiffuse,  vec2(fract(p.x + offset),p.y));
}
横だけにゆらゆらする。

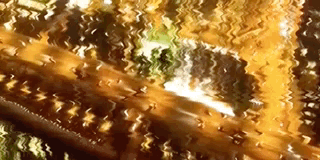
6. 動画テクスチャを強くゆらゆらしてみる
テクスチャを動画にするのはjs側で行います。
window.onload = function () {

    var renderer;
    var camera, scene;
    var theta = 0;
    var clock = new THREE.Clock();
    var time = 0.0;
    var composer;
    var customPass;

    var windowWidth = window.innerWidth;
    var windowHeight = window.innerHeight;
    var aspect = windowWidth / windowHeight;
    var videoTexture;
    var video;

    init();

    function init() {

        // rendererの作成
        renderer = new THREE.WebGLRenderer();
        renderer.setClearColor(new THREE.Color(0xffffff), 1.0);

        // canvasをbodyに追加
        document.body.appendChild(renderer.domElement);

        // canvasをリサイズ
        renderer.setSize(windowWidth, windowHeight);

        // ベースの描画処理(renderTarget への描画用)
        scene = new THREE.Scene();

        //LIGHTS
        var light = new THREE.AmbientLight(0xffffff, 0.5);
        scene.add(light);

        //ベースの描画処理用カメラ
        camera = new THREE.PerspectiveCamera(60, windowWidth / windowHeight, 0.1, 1000);
        camera.position.z = 1;

        //Load Video
        video = document.createElement('video');
        video.loop = true;
        video.src = 'movie/mv.mp4';
        video.play();


        videoTexture = new THREE.Texture(video);
        videoTexture.minFilter = THREE.LinearFilter;
        videoTexture.magFilter = THREE.LinearFilter;
        var material = new THREE.MeshBasicMaterial({
            map: videoTexture
        });

        //var material = new THREE.MeshLambertMaterial();
        var geometry = new THREE.PlaneGeometry(2, 3, 1, 1);
        var mesh = new THREE.Mesh(geometry, material);
        scene.add(mesh);

        composer = new THREE.EffectComposer(renderer);

        //現在のシーンを設定
        var renderPass = new THREE.RenderPass(scene, camera);
        composer.addPass(renderPass);
        //カスタムシェーダー
        var myEffect = {
            uniforms: {
                "tDiffuse": {
                    value: null
                },
                "time": {
                    type: "f",
                    value: time
                },
                "distortion": {
                    type: "f",
                    value: 3.0
                },
                "distortion2": {
                    type: "f",
                    value: 1.0
                },
                "rollSpeed": {
                    type: "f",
                    value: 0.0
                },
                "speed": {
                    type: "f",
                    value: 1.0
                },
                "resolution": {
                    type: 'v2',
                    value: new THREE.Vector2(windowWidth, windowHeight)
                }
            },
            vertexShader: baseVert,
            fragmentShader: baseFrag
        }

        //エフェクト結果をスクリーンに描画する
        customPass = new THREE.ShaderPass(myEffect);
        customPass.renderToScreen = true;
        composer.addPass(customPass);


        render();
    }

    function render() {

        if (video.readyState === video.HAVE_ENOUGH_DATA) {
            if (videoTexture) videoTexture.needsUpdate = true;
        }

        time = clock.getElapsedTime();
        customPass.uniforms.time.value = time;
        composer.render();

        requestAnimationFrame(render);
    }
};
こんな感じになります。

すこしゆらゆらが強いので、係数を掛けます。
void main(){
    vec2 p = vUv;
    float y = p.y + time;
    float offset = snoise(vec2(y,0.0)) * 0.2;
    //0.1を掛ける
    offset = offset * distortion * 0.1;
    gl_FragColor = texture2D(tDiffuse,  vec2(fract(p.x + offset),p.y));
}

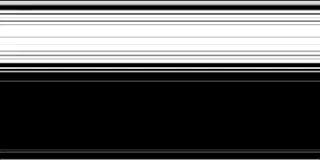
7. 弱くゆらゆらする
↓のようなノイズを加えて細かいゆらゆらを作ります。
void main(){
    vec2 p = vUv;
    float y = p.y + time;
    offset = snoise(vec2(y * 50.0,0.0)) ;
    gl_FragColor = vec4(vec3(offset), 1.);
}
少しゆらゆらが強いのでこちらも係数をかけます。
void main{
    vec2 p = vUv;
    float y = p.y + time;
    //係数0.005を掛ける
    float offset = snoise(vec2(y * 50.0,0.0)) *0.005;
    gl_FragColor = texture2D(tDiffuse,  vec2(fract(p.x + offset),fract(p.y)));

}
8. 強いゆらゆらと、弱いゆらゆらを混ぜる
強いゆらゆらと、弱いゆらゆらを混ぜて、より精度の高いゆらゆらを作ります。
係数を掛けて、UV座標に適応します。
void main(){
    vec2 p = vUv;
    float y = p.y + time;
    float offset = snoise(vec2(y,0.0));
    offset = offset * distortion * 0.01;
    offset += snoise(vec2(y * 50.0,0.0)) * 0.005;
    gl_FragColor = texture2D(tDiffuse,  vec2(fract(p.x + offset),p.y));
}
まとめ
ノイズをうまく使うと色々な表現ができそうです。
参考
こちらを参考にさせていただきました。 と、いうよりもほとんど参考サイトのままです。 https://github.com/felixturner/bad-tv-shader